Proxy Setup & Configuration

|

|
| ExplorerFirefoxChromeOpera |
Firefox US Proxy Configuration
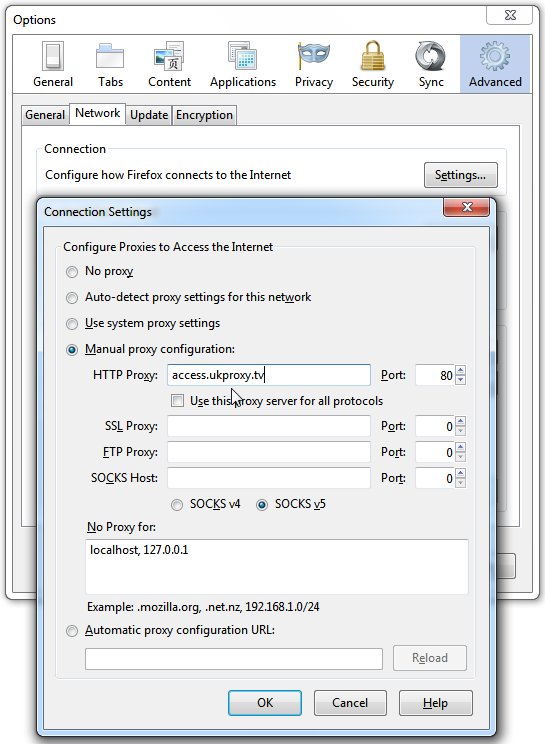
In order to use our proxy service you will have to configure the provided proxy address (ip.usproxy.tv) and port (80) in Firefox under Options -> Network (tab) -> Settings.
You can do it right away or you can follow the step by step instructions below:
Step by step proxy configuration instructions for Firefox:
- In Firefox, under Firefox\Options-> click “Options” in order to start changing the browser settings.
- In “Options” window go to the icon for “Advanced” options then go to “Network” tab and click on the “Settings” button.
- In the “Connection Settings” window select the radio button named: “Manual Proxy Configuration”.
- Type the proxy server name: ip.usproxy.tv in the “HTTP Proxy” field. Type 80 in the “Port” field.
- Click the OK button in order to save the changes made in the “Connection Settings” window.
- Click the Ok button in the “Options” window in order to finish the configuration.
Browse to any desired web page like www.google.com and a pop-up message requesting your user name and password shall appear. Just type them in and enjoy.
For more details check the step by step configuration screenshots below:
Firefox detailed proxy setup instructions containing step by step configuration screenshots.
1. Open Firefox, Click on "Firefox" in the upper-left corner and select Options. Click “Options” in order to start changing the browser settings. Alternatively you can go the Tools menu (you can Press ALT + T for it to show up) and click Options. |
 |
2. In “Options” window go to the icon for “Advanced” options then go to “Network” tab and click on the “Settings” button. |
 |
3. n the “Connection Settings” window select the radio button named: “Manual Proxy Configuration”. |
 |
4. Type the proxy server name: ip.usproxy.tv in the “HTTP Proxy” field. Type 80 in the “Port” field. |
 |
5. Click the OK button in order to save the changes made in the “Connection Settings” window. |
 |
6. Click the Ok button in the “Options” window in order to finish the configuration. |
 |


