


Proxy Setup & Configuration

|

|
| ExplorerFirefoxChromeOpera |
Google Chrome US Proxy Configuration
In order to use our proxy service you will have to configure the provided proxy address (ip.usproxy.tv) and port (80) in the LAN settings window under Advanced Settings\Network\Change Proxy Settings.
You can do it right away or you can follow the step by step instructions below:
Step by step proxy configuration instructions for Google Chrome:
- In Chrome, under Customize and Control Google Chrome click Settings in order to start changing the browser settings.
- Scroll down and click the link Show Advanced Settings in order to display the list of advanced settings in Chrome.
- Scroll down until you see the Network paragraph. Under this alignment you click on the button Change Proxy Settings in order to open the Internet Options window.
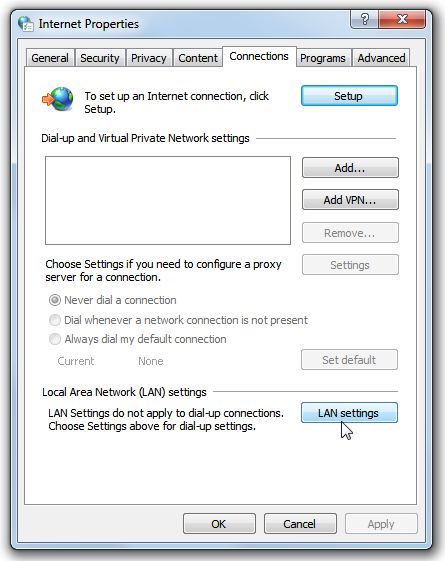
- Under the Connections tab on the lower right side click on the LAN settings button in order to open the LAN settings window.
- In the second half of the LAN settings window you will see the Proxy server area. Here tick the checkbox for the message Use a proxy... in order to activate the fields: Address and Port
- In the Address field just type: ip.usproxy.tv
- In the Port field just type: 80 in case a different port number is present there.
- Click the OK button for LAN Settings window in order to store the settings.
- Click the OK button for the Internet Options window in order to store the settings and close the menu.
Browse to any desired web page like www.google.com and a pop-up message requesting your user name and password shall appear. Just type them in and enjoy.
For more details check the step by step configuration screenshots below:
Google Chrome detailed proxy setup instructions containing step by step configuration screenshots.
1. In Chrome, under Customize and Control Google Chrome click Settings in order to start changing the browser settings. |
 |
2. Scroll down and click the link Show Advanced Settings in order to display the list of advanced settings in Chrome. |
 |
3. Scroll down until you see the Network paragraph. Under this alignment you click on the button Change Proxy Settings in order to open the Internet Options window. |
 |
4. Under the Connections tab on the lower right side click on the LAN settings button in order to open the LAN settings window. |
 |
5. In the second half of the LAN settings window you will see the Proxy server area. Here tick the checkbox for the message Use a proxy server... in order to activate the fields: Address and Port |
 |
6. In the Address field just type: ip.usproxy.tv In the Port field just type: 80 in case a different port number is present there. |
 |
7. Click the OK button for LAN Settings window in order to store the setting. |
 |
8. Click the OK button for the Internet Options window in order to store the settings and close the menu. |
 |